CUA:GUIAgents 运行时与电脑使用闭环
基于 trycua/cua 源码,解析 CUA 的项目分层和 GUIAgents 运行时:ComputerAgent 如何选择模型 loop、统一工具协议、执行电脑动作、回灌截图,并兼容 OpenAI、Claude、UI-TARS、OmniParser 和组合 grounding 模型。
项目:trycua/cua
分析版本:main@edbcf3b,提交时间2026-06-15T09:42:56Z
核心结论:CUA 的 GUIAgents 实现集中在libs/python/agent/cua_agent运行时。ComputerAgent将多种 GUI 模型输出标准化为computer_call,交给真实电脑或 sandbox 执行,并把动作后的截图作为下一轮模型输入。
trycua/cua 在 README 中将项目定位为 “Build, benchmark, and deploy agents that use computers”。从源码结构看,CUA 的核心价值不在于封装一层 LLM API,而在于把 GUI agent 运行所需的模型适配、动作协议、执行环境和轨迹管理拆成可替换的层:
cua-agent:模型 loop、工具 schema、回调、轨迹、预算和主循环;cua-computer:把云端、本地 VM、Docker、Windows Sandbox、Lume 等环境统一成Computer;cua-computer-server:在目标环境里暴露截图、鼠标、键盘、shell、文件、窗口、浏览器和 MCP 能力;cua-sandbox/cua-bench:面向可复现环境、benchmark 和训练轨迹;cua-driver:让外部 coding agent 通过 MCP/CLI 操作后台桌面。
下文中的 GUIAgents 指的是 CUA 在 libs/python/agent/cua_agent 中实现的 GUI agent runtime。它承担的职责很明确:把不同 GUI 模型的输出格式收敛到统一动作协议,并维持“观察屏幕、生成动作、执行动作、回灌截图”的闭环。
总览:CUA 把 GUIAgent 切成五层
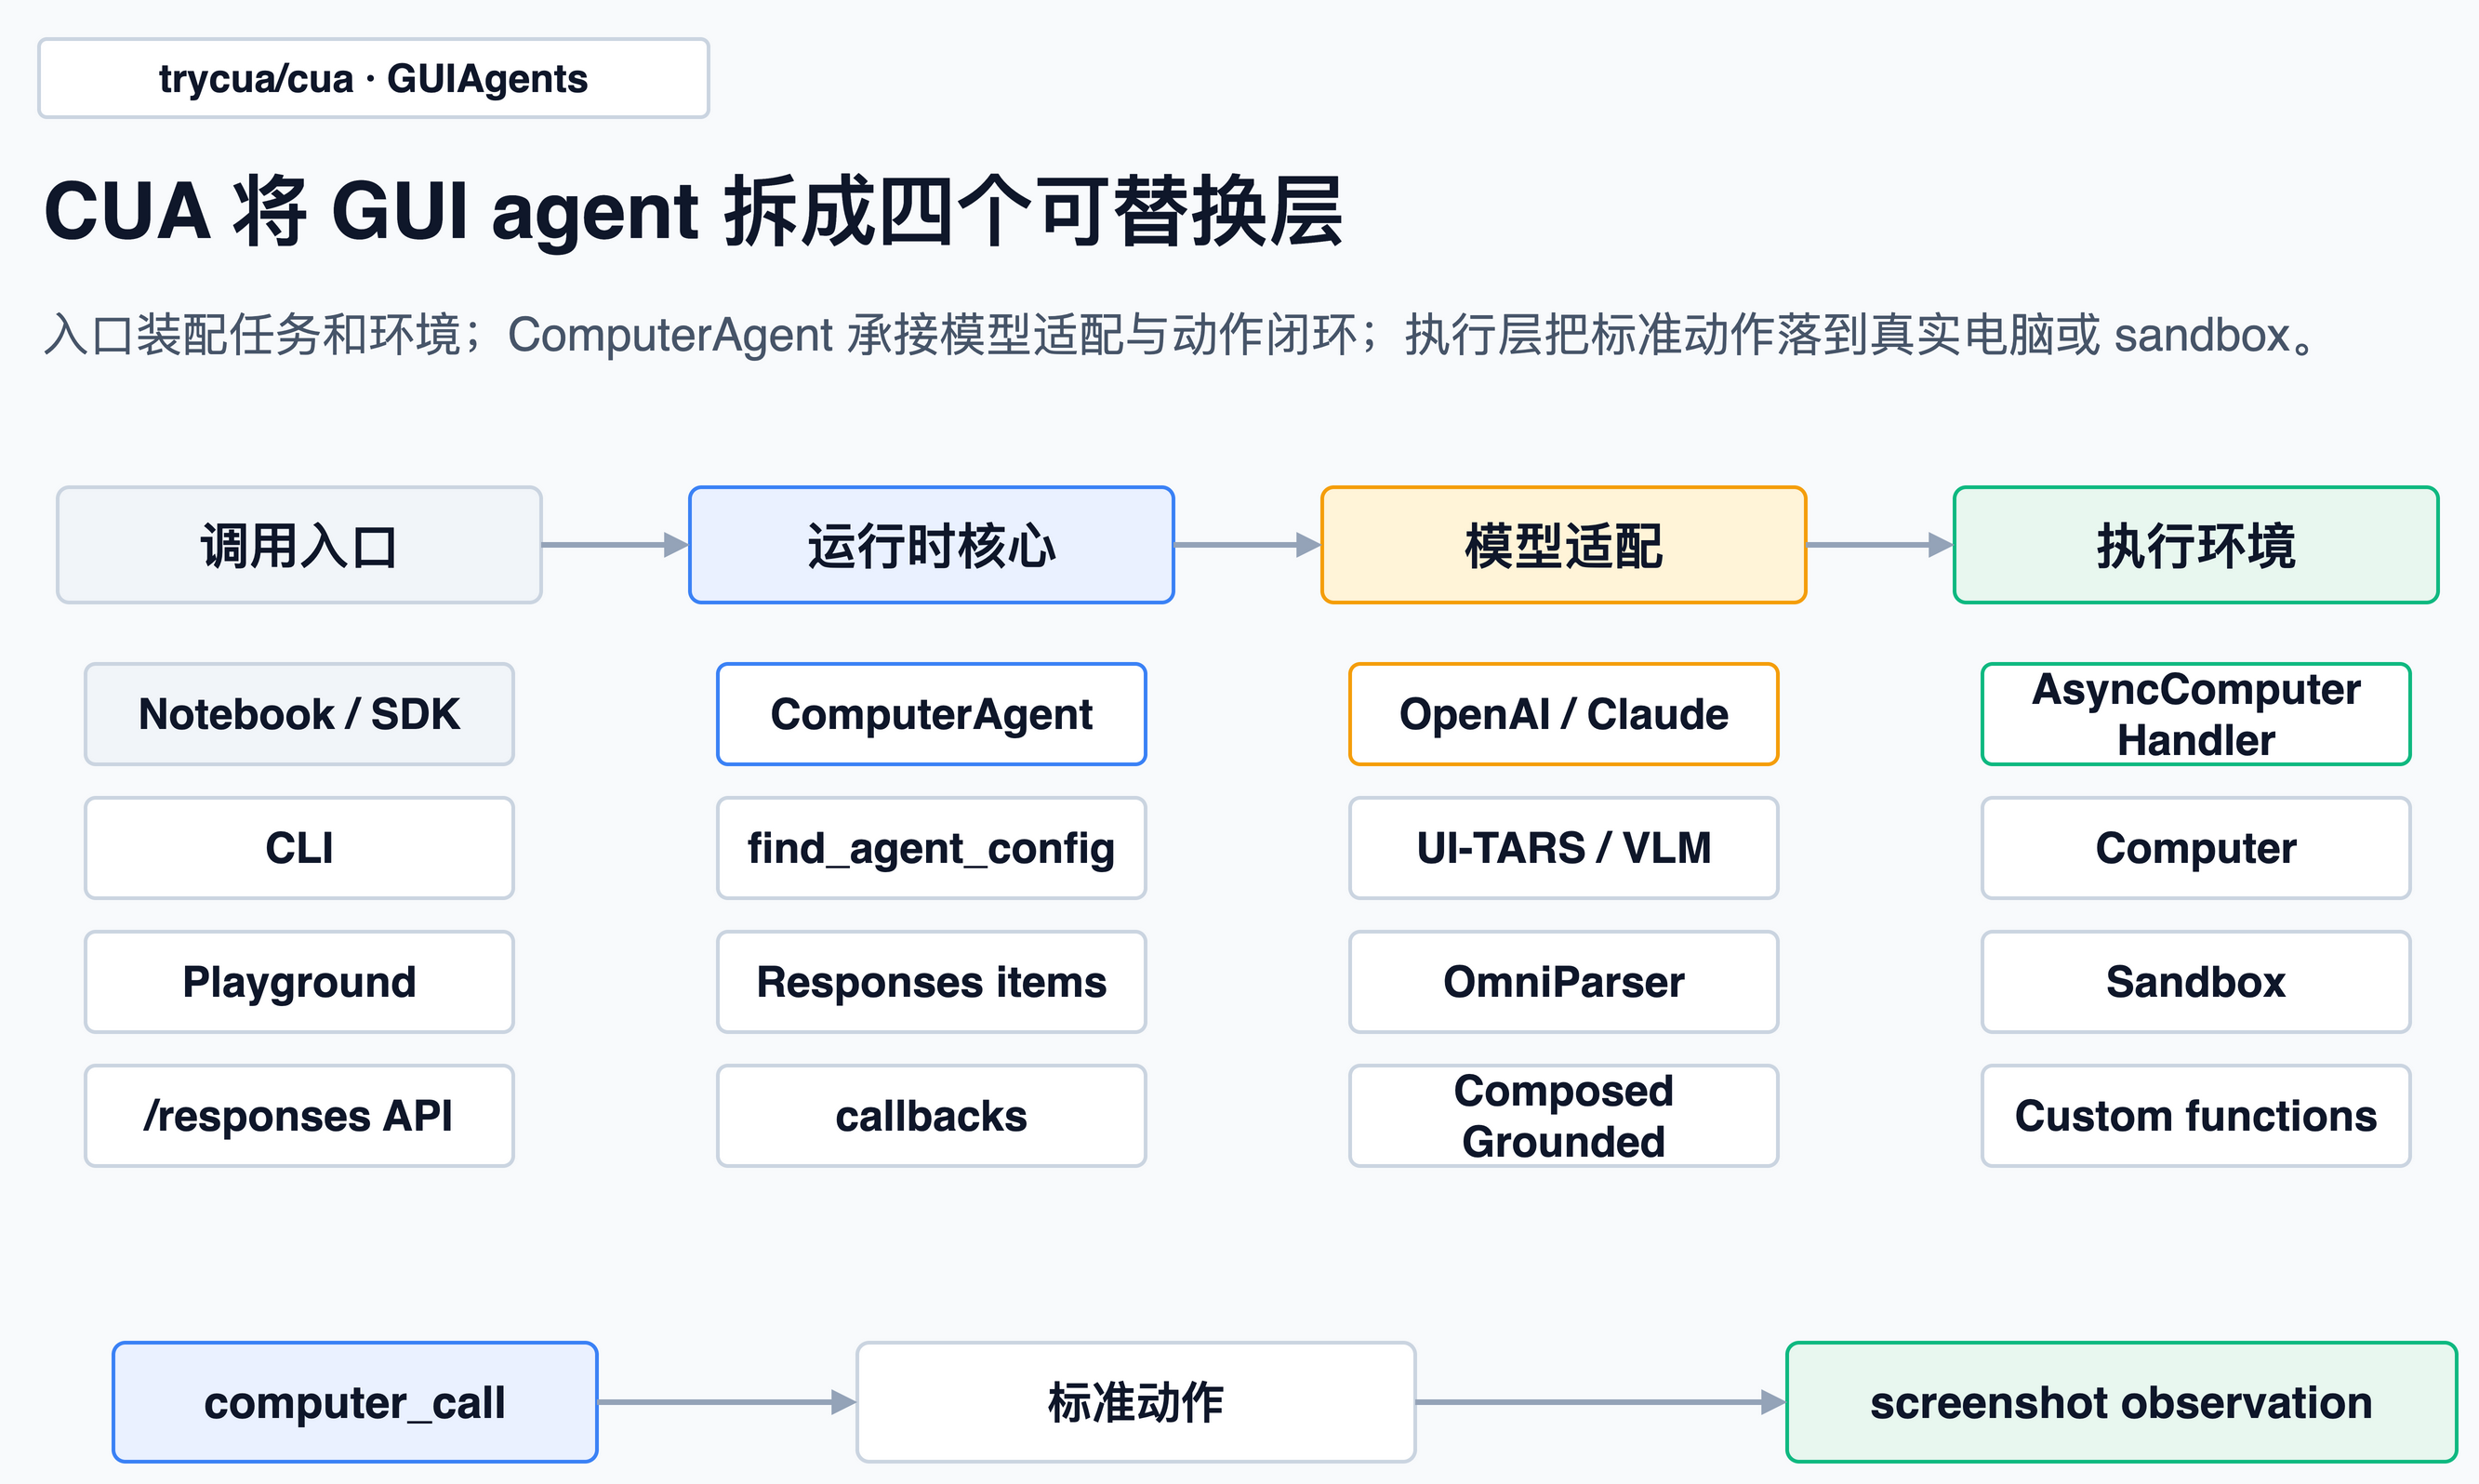
总览图展示了 CUA 的主要边界:入口层负责装配任务和环境;ComputerAgent 是运行时核心,负责模型 loop 选择、统一输出协议、执行调度和生命周期回调;执行层则把标准化动作落到 Computer、Sandbox 或自定义函数。
顶层 README 的包列表也能印证这个拆法:cua-agent 是 agent framework,cua-sandbox 是创建和控制 sandbox 的 SDK,cua-computer-server 是 sandbox 里的 UI interaction / code execution driver,cua-bench 是 benchmark 和 RL 环境。
GUIAgent 的主入口在 ComputerAgent:
class ComputerAgent:
    """
    Main agent class that automatically selects the appropriate agent loop
    based on the model and executes tool calls.
    """
来自 libs/python/agent/cua_agent/agent.py。
这段注释明确了职责边界:ComputerAgent 不承担模型推理,而是选择合适的 agent_loop,并执行模型返回的工具调用。
入口:Notebook、CLI、Playground 收敛到 ComputerAgent
CUA 提供了几种入口,但这些入口最终都会收敛到同一个运行时对象。
在 CLI 中,用户选择 provider 后会创建 Computer,再把它放进 tools:
async with Computer(**computer_kwargs) as computer:
    agent_kwargs = {
        "model": args.model,
        "tools": [computer],
        "max_retries": args.max_retries,
    }
    agent = ComputerAgent(**agent_kwargs)
来自 libs/python/agent/cua_agent/cli.py。
Playground 路径相同。它的 /responses 接口会把请求里的 model、input、agent_kwargs 转成一次 agent.run(messages):
agent = ComputerAgent(model=model, **agent_kwargs)

async for result in agent.run(messages):
    total_output += result["output"]
来自 libs/python/agent/cua_agent/playground/server.py。
computer-server 也提供 /responses 接口。如果调用方没有显式传 tools,它会注入一个 DirectComputer(),直接代理本进程里的自动化 handler:
tools = agent_kwargs.get("tools")
if not tools:
    tools = [DirectComputer()]
    agent_kwargs = {**agent_kwargs, "tools": tools}
agent = ComputerAgent(model=model, **agent_kwargs)
来自 libs/python/computer-server/computer_server/main.py。
由此可见,CUA 没有把 GUIAgent 主逻辑散落在 CLI、Web UI 或 server 入口中。入口层只负责装配环境,核心循环仍由 ComputerAgent 承担。
触发条件:模型名决定走哪个 loop
CUA 的模型 loop 不是硬编码 if model == ...。每个 loop 通过 @register_agent 注册自己的模型正则、优先级和工具类型:
def register_agent(models: str, priority: int = 0, tool_type: Optional[str] = None):
    ...
    config_info = AgentConfigInfo(
        agent_class=agent_class,
        models_regex=models,
        priority=priority,
        tool_type=tool_type,
    )
    _agent_configs.append(config_info)
    _agent_configs.sort(key=lambda x: x.priority, reverse=True)
来自 libs/python/agent/cua_agent/decorators.py。
ComputerAgent.__init__ 里会用 find_agent_config(model) 找匹配项,然后实例化 loop:
if custom_loop:
    self.agent_loop = custom_loop
else:
    config_info = find_agent_config(model)
    if not config_info:
        raise ValueError(f"No agent config found for model: {model}")
    self.agent_loop = config_info.agent_class()
来自 libs/python/agent/cua_agent/agent.py。
注册表里能看到几类典型分支:
| loop | 匹配方式 | 作用 |
|---|---|---|
OpenAIComputerUseConfig | computer-use-preview、gpt-5.4 | OpenAI Responses / computer tool |
AnthropicHostedToolsConfig | .*claude-.* | Anthropic hosted computer tool |
UITARSConfig | .*ui-?tars.* | UI-TARS 1.x prompt + action parser |
UITARS2Config | .*ui-?tars-?2.* | UI-TARS 2 的 seed tool call 格式 |
OmniparserConfig | omniparser+.*、omni+.* | 先标注元素 ID,再让 LLM 选择 |
ComposedGroundedConfig | .*\+.* | grounding 模型 + thinking 模型组合 |
GenericVlmConfig | .*,低优先级 | Qwen 风格的通用 VLM fallback |
模型匹配还有两个实现细节。
第一,find_agent_config 会先看原始模型名,再把 cua/<provider>/... 这种路由前缀剥掉匹配。因此,cua/anthropic/claude... 仍然会走 Claude loop。
第二,优先级决定匹配顺序。omni+... 的优先级是 2,组合模型 .*+.* 是 1,通用 VLM fallback 是 -100。因此,omni+gemini... 不会被普通 .*+.* 提前匹配。
主流程:预测、执行、截图、回灌
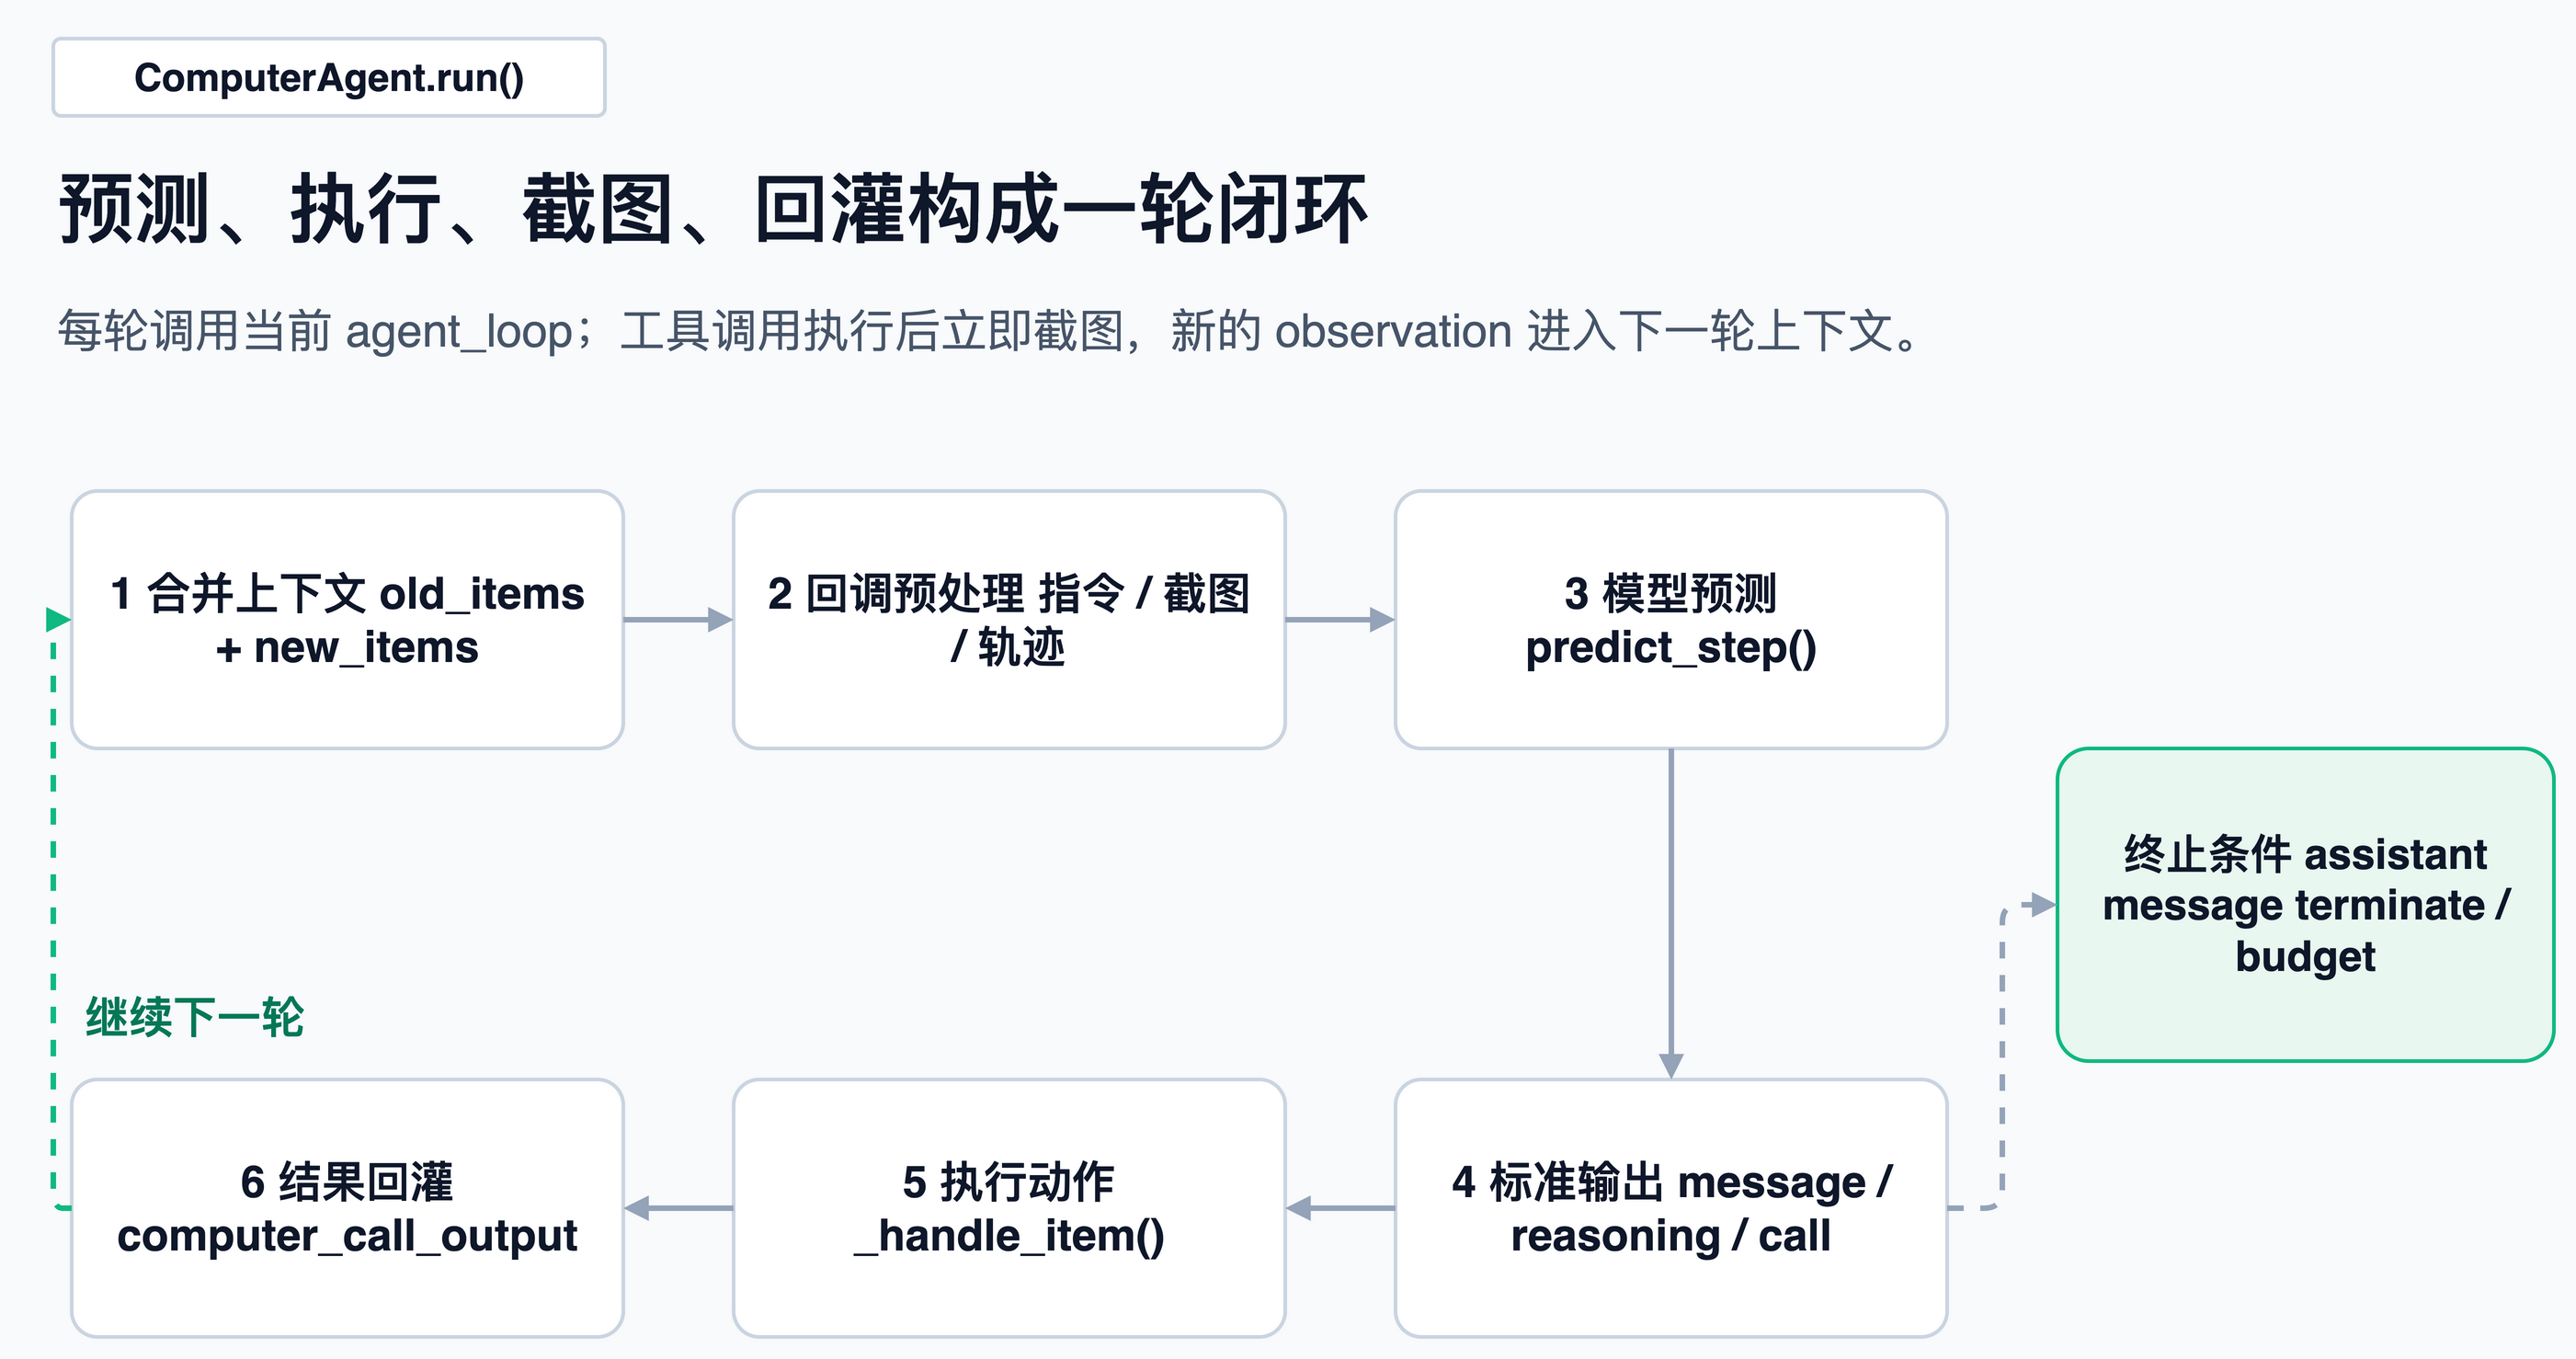
ComputerAgent.run() 的核心不是一次模型调用,而是一个循环。它会把旧消息和本轮新消息合并,交给当前 loop 的 predict_step();如果模型返回工具调用,它就执行工具,把结果追加进 new_items,继续下一轮。
while new_items[-1].get("role") != "assistant" if new_items else True:
    combined_messages = old_items + new_items
    preprocessed_messages = await self._on_llm_start(combined_messages)
    result = await _predict_step_with_retry(
        self.agent_loop,
        loop_kwargs,
        hooks={...},
        max_retries=self.max_retries,
    )
来自 libs/python/agent/cua_agent/agent.py。
这段循环可以分解为:
- 如果还没有最终 assistant 文本,就继续;
- 每轮先跑回调,比如 prompt instructions、图片保留、PII 处理;
- 调对应模型 loop,让模型给出下一步;
- 统一拿到
output,里面可能是message、reasoning、computer_call、function_call; - 对每个工具调用执行
_handle_item(); - 工具结果追加回历史;
- 下一轮模型能看到刚才动作后的新截图。
动作执行也在同一个地方。对于 computer_call,CUA 会根据 action.type 找同名 computer 方法:
action = item.get("action")
action_type = action.get("type") if action else None
action_args = {k: v for k, v in action.items() if k != "type"}
computer_method = getattr(computer, action_type, None)
action_result = await computer_method(**action_args)
来自 libs/python/agent/cua_agent/agent.py。
如果不是 terminate,执行后立刻截图,并把截图包装成 computer_call_output:
if not is_terminate:
    if self.screenshot_delay and self.screenshot_delay > 0:
        await asyncio.sleep(self.screenshot_delay)
    screenshot_base64 = await computer.screenshot()

call_output = {
    "type": "computer_call_output",
    "call_id": item.get("call_id"),
    "output": {
        "type": "input_image",
        "image_url": f"data:image/png;base64,{screenshot_base64}",
    },
}
来自 libs/python/agent/cua_agent/agent.py。
这一段构成了 GUIAgent 的闭环核心:模型不是一次性看图答题,而是在每个动作后获得新的 observation。任务之所以能持续推进,是因为屏幕状态被编码回 computer_call_output。
统一协议:模型输出标准化为 Responses items
CUA 里有一个很重要的中间协议:Responses items。源码里专门有一组 helper,把不同格式变成 computer_call、function_call、message、reasoning。
例如点击、滚动、输入这些动作都会变成 OpenAI Responses 风格的 computer_call:
def make_click_item(x: int, y: int, button: Literal[...] = "left", call_id=None):
    return ResponseComputerToolCallParam(
        call_id=call_id if call_id else random_id(),
        action=ActionClick(button=button, type="click", x=x, y=y),
        pending_safety_checks=[],
        status="completed",
        type="computer_call",
    )
来自 libs/python/agent/cua_agent/responses.py。
普通 chat completion 的消息也能转成 Responses items;反过来,Responses items 也能转回 completion messages:
def convert_responses_items_to_completion_messages(...):
    ...
def convert_completion_messages_to_responses_items(...):
    ...
来自 libs/python/agent/cua_agent/responses.py。
这层适配是运行时设计的关键。OpenAI 的 computer-use、Anthropic 的 hosted tool、UI-TARS 的文本动作、Qwen 的 <tool_call>、OmniParser 的元素 ID,最终都会回到同一个动作协议。否则,外层执行器就必须理解每个模型的输出方言。
模型 loop:三类适配路线
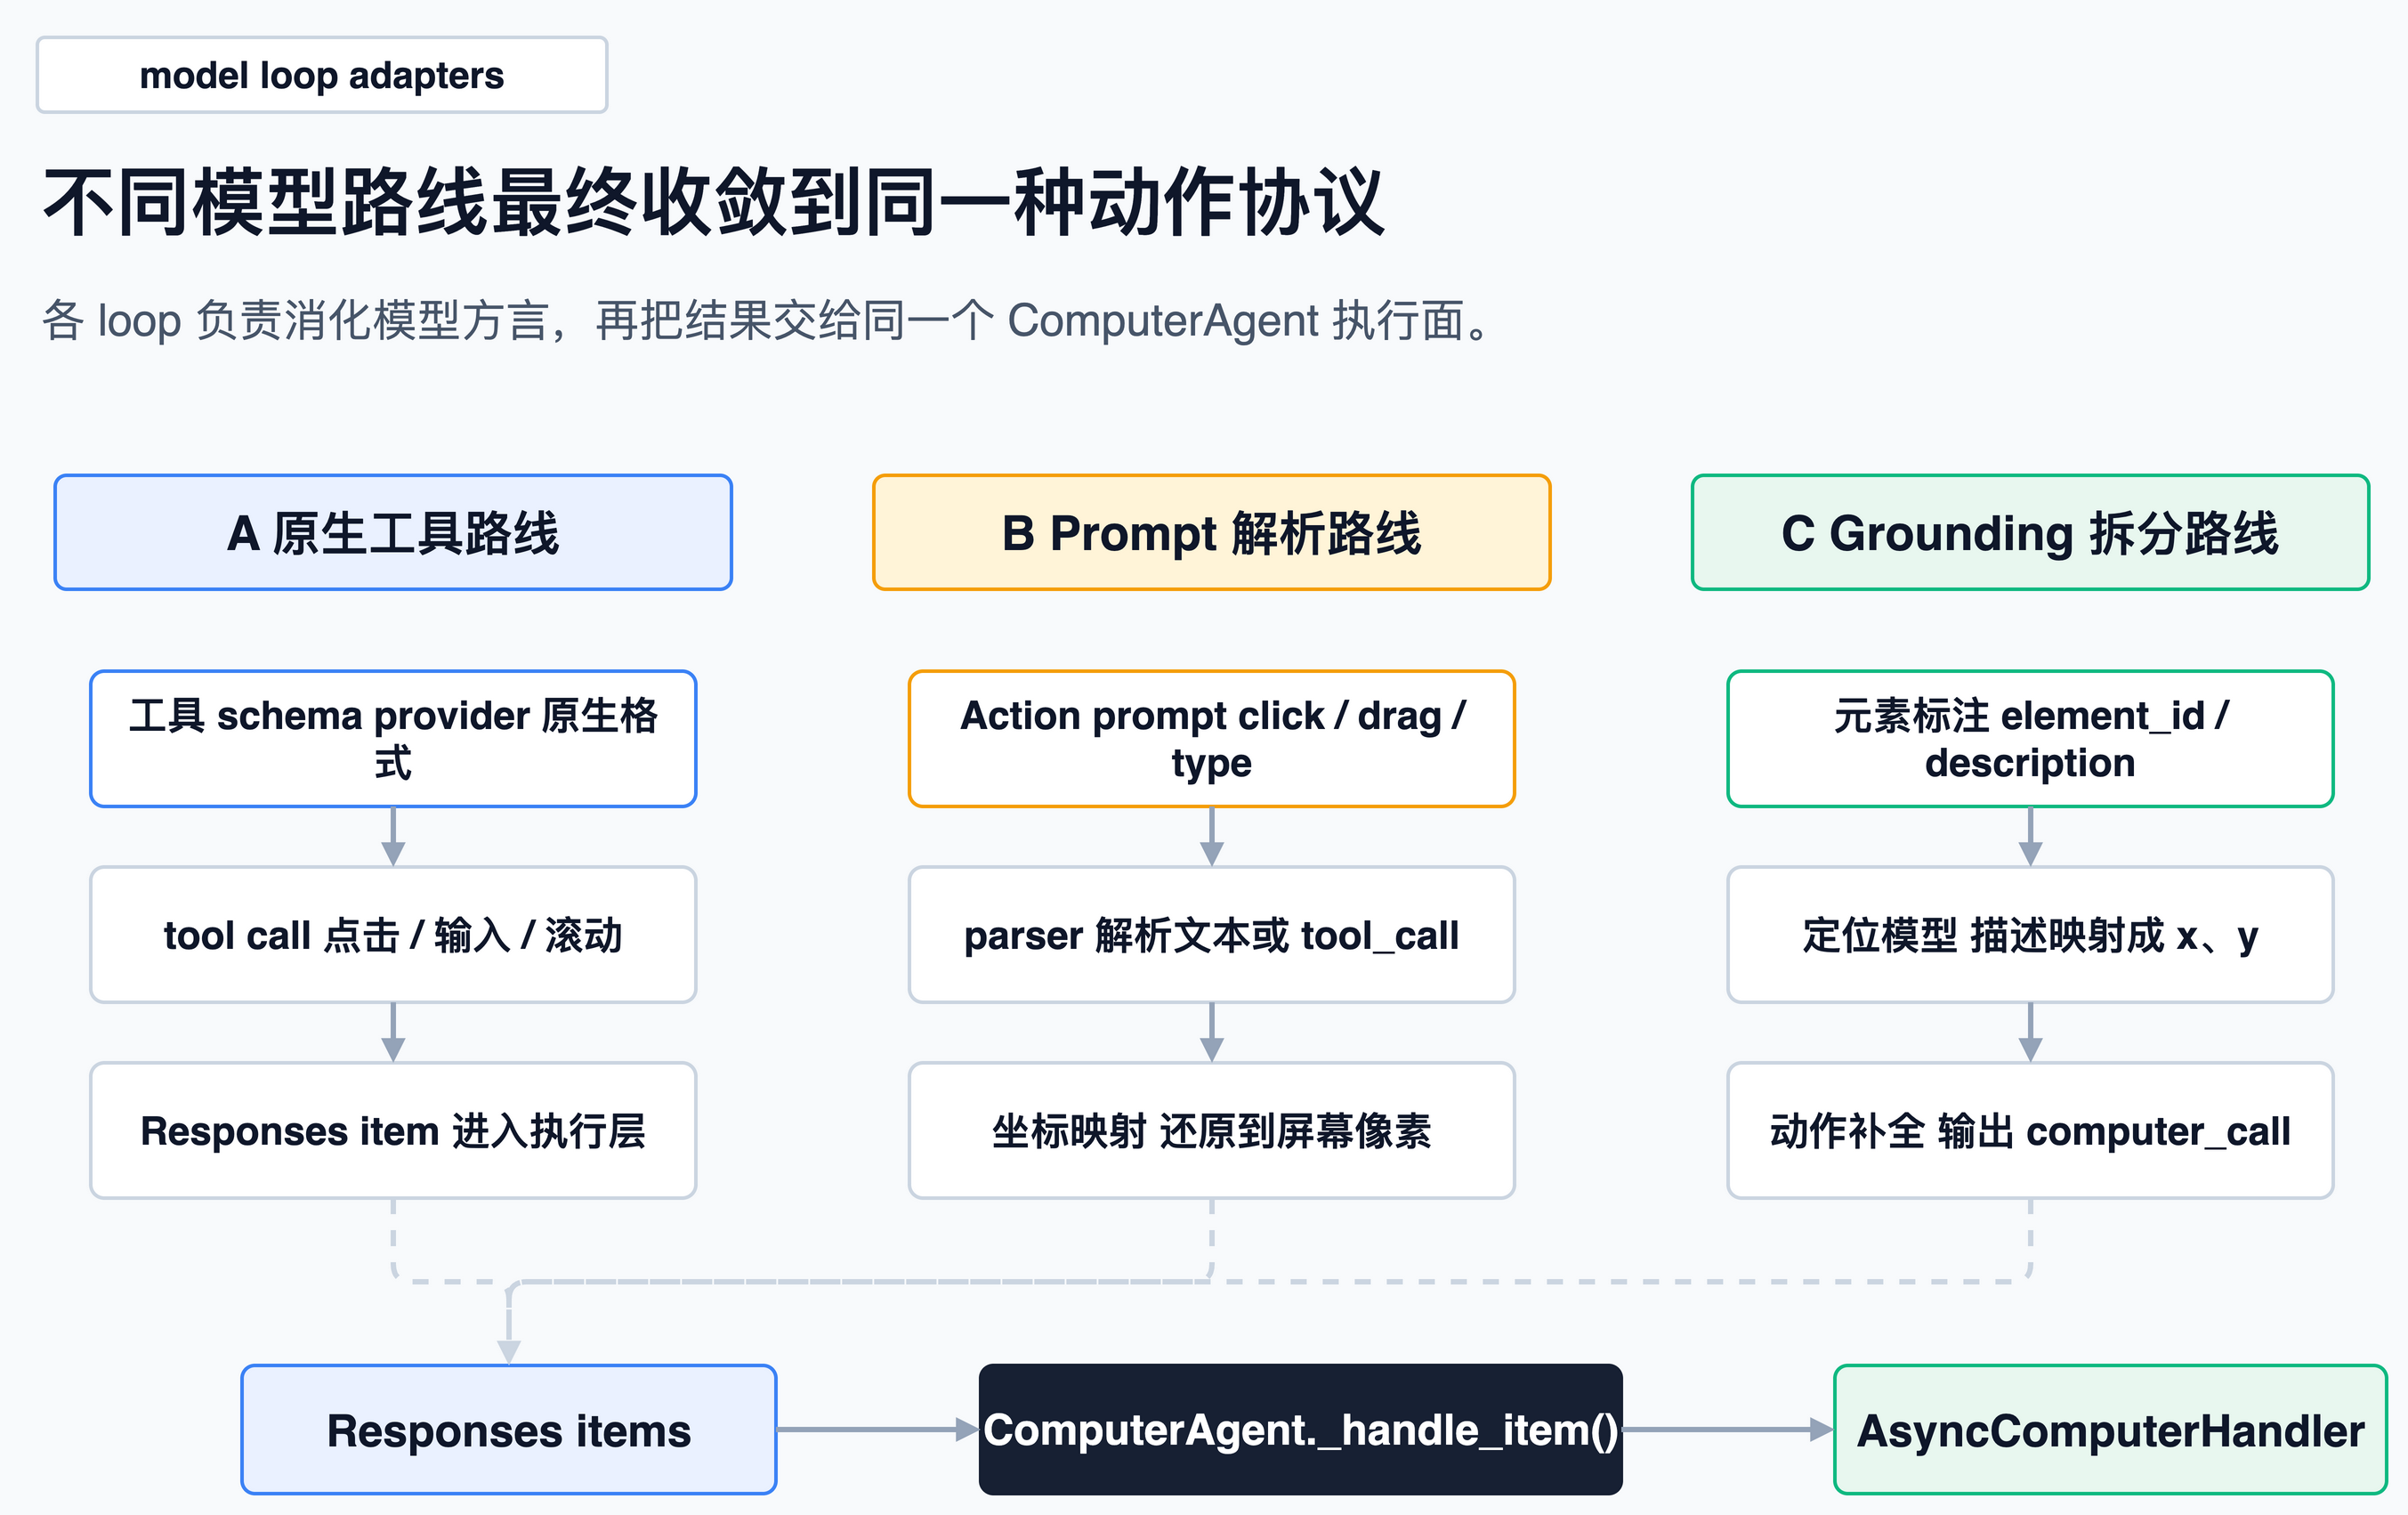
CUA 支持多种模型。从源码实现看,这些模型 loop 大致可以归为三类。
1. 原生工具路线:OpenAI / Anthropic
OpenAI loop 会根据模型能力生成两种工具 schema。computer-use-preview 用原生 computer_use_preview;其他如 gpt-5.4 风格模型用标准 function calling。
if use_native_tool:
    return {
        "type": "computer_use_preview",
        "display_width": width,
        "display_height": height,
        "environment": environment,
    }
来自 libs/python/agent/cua_agent/loops/openai.py。
然后直接走 litellm.aresponses(...):
api_kwargs = {
    "model": model,
    "input": messages,
    "tools": openai_tools if openai_tools else None,
    "reasoning": {"summary": "concise"},
    "truncation": "auto",
}
response = await litellm.aresponses(**api_kwargs)
来自 libs/python/agent/cua_agent/loops/openai.py。
Anthropic loop 做的事类似,只是工具 schema 和 beta header 是 Anthropic 格式:
anthropic_tools = await _prepare_tools_for_anthropic(tools, model)
api_kwargs = {
    "model": model,
    "messages": completion_messages,
    "tools": anthropic_tools if anthropic_tools else None,
}
if anthropic_tools:
    api_kwargs["headers"] = {"anthropic-beta": tool_config["beta_flag"]}
来自 libs/python/agent/cua_agent/loops/anthropic.py。
这类 loop 主要承担轻量适配:模型本身已经支持 computer-use tool,CUA 负责把工具规格、历史消息、坐标缩放和返回项转成统一格式。
2. Prompt + 解析路线:UI-TARS / Generic VLM
UI-TARS 没有直接返回 OpenAI Responses items。它的 loop 先构造一个 GUI action prompt,让模型输出 Thought 和 Action:
UITARS_PROMPT_TEMPLATE = """You are a GUI agent...

## Output Format
Thought: … Action: …
## Action Space
{action_space}
"""
来自 libs/python/agent/cua_agent/loops/uitars.py。
动作空间里包含点击、双击、右键、拖拽、热键、输入、滚动、等待和完成:
click(start_box='<|box_start|>(x1,y1)<|box_end|>')
drag(start_box='<|box_start|>(x1,y1)<|box_end|>', end_box='...')
type(content='')
scroll(start_box='<|box_start|>(x1,y1)<|box_end|>', direction='down or up or right or left')
finished(content='xxx')
来自 libs/python/agent/cua_agent/loops/uitars.py。
模型输出后,CUA 用 parse_uitars_response() 解析动作字符串,再用 convert_to_computer_actions() 转成统一 computer_call。比如 click 会取 box 中心点,乘回原图宽高:
elif action_type in ["click", "left_single"]:
    start_box = action_inputs.get("start_box")
    if start_box:
        coords = eval(start_box)
        x = int((coords[0] + coords[2]) / 2 * image_width)
        y = int((coords[1] + coords[3]) / 2 * image_height)
        computer_actions.append(make_click_item(x, y, "left"))
来自 libs/python/agent/cua_agent/loops/uitars.py。
Generic VLM 走的是另一种 prompt/function hybrid。它用 Qwen/NouS 风格把工具 schema 注入系统消息,如果历史里没有截图,就主动从 computer_handler 截一张:
if not _has_any_image(completion_messages):
    if computer_handler is None or not hasattr(computer_handler, "screenshot"):
        raise RuntimeError(...)
    screenshot_b64 = await computer_handler.screenshot()
    completion_messages.append({
        "role": "user",
        "content": [
            {"type": "image_url", "image_url": {"url": f"data:image/png;base64,{screenshot_b64}"}},
            {"type": "text", "text": "Current screen"},
        ],
    })
来自 libs/python/agent/cua_agent/loops/generic_vlm.py。
Generic VLM 还会处理截图缩放与坐标还原:用 smart_resize 调整截图,再把 0..1000 的坐标映射回实际像素。CUA 并不是把模型坐标直接交给鼠标执行,而是针对不同模型的坐标空间做了适配。
3. Grounding 拆分路线:OmniParser / ComposedGrounded
第三类路线将“任务推理”和“屏幕定位”拆开处理。
OmniParser loop 会先解析截图,把可交互元素画上编号,再让 LLM 对编号做选择。源码里会把每个元素的中心点记录成 id2xy:
result = parser.parse(image_data)
for element in result.elements:
    norm_x = (element.bbox.x1 + element.bbox.x2) / 2
    norm_y = (element.bbox.y1 + element.bbox.y2) / 2
    pixel_x = int(norm_x * width)
    pixel_y = int(norm_y * height)
    local_id2xy[element.id] = (pixel_x, pixel_y)
来自 libs/python/agent/cua_agent/loops/omniparser.py。
后面如果模型返回 element_id,CUA 再把它替换成真实 x, y:
if "element_id" in action:
    element_id = action["element_id"]
    if element_id in id2xy:
        x, y = id2xy[element_id]
        action["x"] = x
        action["y"] = y
        del action["element_id"]
来自 libs/python/agent/cua_agent/loops/omniparser.py。
ComposedGrounded 更通用:模型名里用 + 分成两个模型,左边是 grounding model,右边是 thinking model。
grounding_model, thinking_model = model.split("+", 1)
...
coords = await grounding_agent.predict_click(
    model=grounding_model,
    image_b64=last_image_b64,
    instruction=desc,
)
if coords:
    self.desc2xy[desc] = coords
来自 libs/python/agent/cua_agent/loops/composed_grounded.py。
在这一路线中,thinking model 不必直接输出坐标。它可以生成“点击搜索框”“拖到提交按钮”这类目标描述,再由 grounding model 将描述映射到屏幕坐标。对应的转换函数在 responses.py:
if "element_description" in action:
    desc = action["element_description"]
    if desc in desc2xy:
        x, y = desc2xy[desc]
        action["x"] = x
        action["y"] = y
来自 libs/python/agent/cua_agent/responses.py。
这种拆分使 CUA 更适合作为实验平台:grounding 模型和 reasoning 模型可以独立替换,不必绑定成单一模型。
执行面:Computer、Sandbox、自定义函数都统一成 handler
模型输出最终会交给 AsyncComputerHandler。这个协议定义了 GUIAgent 能执行的动作空间:
async def screenshot(self, text: Optional[str] = None) -> str: ...
async def click(self, x: int, y: int, button: str = "left") -> None: ...
async def scroll(self, x: int, y: int, scroll_x: int, scroll_y: int) -> None: ...
async def type(self, text: str) -> None: ...
async def keypress(self, keys: Union[List[str], str]) -> None: ...
来自 libs/python/agent/cua_agent/computers/base.py。
make_computer_handler() 则负责把不同来源转成这个协议:
if isinstance(computer, AsyncComputerHandler):
    return computer
if cuaComputer is not None and isinstance(computer, cuaComputer):
    computer_handler = cuaComputerHandler(computer)
    await computer_handler._initialize()
    return computer_handler
if cuaSandbox is not None and isinstance(computer, cuaSandbox):
    return SandboxComputerHandler(computer)
if isinstance(computer, dict):
    return CustomComputerHandler(computer)
来自 libs/python/agent/cua_agent/computers/__init__.py。
这种设计让 GUIAgent 不需要关心底层是云容器、本地 VM、Android 模拟器,还是调用方传入的一组函数。只要 handler 能截图、能点击、能输入,外层循环就能运行。
对于 Computer,CUA 会先启动或连接 VM,再用 InterfaceFactory 创建 OS 对应接口:
response = await self.config.vm_provider.run_vm(
    image=self.image,
    name=self.config.name,
    run_opts=run_opts,
    storage=storage_param,
)
...
interface = InterfaceFactory.create_interface_for_os(
    os=self.os_type,
    ip_address=ip_address,
    api_port=self.api_port,
)
await self._interface.wait_for_ready(timeout=self.timeout)
来自 libs/python/computer/computer/computer.py。
到了 sandbox 内部,computer-server 把命令路由到不同 handler:截图、鼠标、键盘、shell、文件、窗口、浏览器都在这里暴露。
handlers = {
    "run_command": automation_handler.run_command,
    "left_click": automation_handler.left_click,
    "right_click": automation_handler.right_click,
    "double_click": automation_handler.double_click,
    "type_text": automation_handler.type_text,
    "press_key": automation_handler.press_key,
    "screenshot": automation_handler.screenshot,
    "get_screen_size": automation_handler.get_screen_size,
}
来自 libs/python/computer-server/computer_server/main.py。
所以一条点击链路完整展开是:
模型输出 click(x, y) -> ComputerAgent._handle_item() -> AsyncComputerHandler.click() -> Computer.interface.left_click() 或 Sandbox.mouse.click() -> computer-server / OS handler -> 屏幕变化 -> screenshot() -> 下一轮输入。
写入和复用:轨迹、截图、预算、图片裁剪都走 callback
ComputerAgent 初始化时会自动塞一组 callback:
self.callbacks.insert(0, OperatorNormalizerCallback())
if self.instructions:
    self.callbacks.append(PromptInstructionsCallback(self.instructions))
if self.only_n_most_recent_images:
    self.callbacks.append(ImageRetentionCallback(self.only_n_most_recent_images))
if self.trajectory_dir:
    self.callbacks.append(TrajectorySaverCallback(...))
if max_trajectory_budget:
    self.callbacks.append(BudgetManagerCallback(...))
来自 libs/python/agent/cua_agent/agent.py。
这几个 callback 分别解决不同生命周期问题。
PromptInstructionsCallback 很轻量,只是在每次 LLM 调用前往消息头部插一条用户指令:
return [
    {"role": "user", "content": self.instructions},
] + messages
来自 libs/python/agent/cua_agent/callbacks/prompt_instructions.py。
ImageRetentionCallback 会保留最近 N 张截图,防止 GUIAgent 长程任务把上下文撑爆:
output_indices = []
for idx, msg in enumerate(messages):
    if msg.get("type") == "computer_call_output":
        out = msg.get("output")
        if isinstance(out, dict) and ("image_url" in out):
            output_indices.append(idx)
来自 libs/python/agent/cua_agent/callbacks/image_retention.py。
TrajectorySaverCallback 会把每次 run 的 metadata、API 请求、响应和截图保存到本地目录:
self.trajectory_id = f"{now.strftime('%Y-%m-%d')}_{model_name_short}_{now.strftime('%H%M%S')}_{str(uuid.uuid4())[:4]}"
...
metadata = {
    "trajectory_id": self.trajectory_id,
    "status": "running",
    "kwargs": kwargs_to_save,
}
来自 libs/python/agent/cua_agent/callbacks/trajectory_saver.py。
BudgetManagerCallback 则在 usage 回调里累加 response_cost,每轮开始前决定是否继续:
async def on_usage(self, usage: Dict[str, Any]) -> None:
    if "response_cost" in usage:
        self.total_cost += usage["response_cost"]

async def on_run_continue(...):
    if self.total_cost >= self.max_budget:
        return False
来自 libs/python/agent/cua_agent/callbacks/budget_manager.py。
因此,CUA 的复用能力不止于再次调用模型。它会把轨迹、截图、响应、usage 和模型名落盘,为 debug、benchmark、训练数据导出留入口。
边界与常见误解
第一,CUA 不是只支持坐标点击。UI-TARS、Qwen 类 loop 确实会把动作落成坐标;但 OmniParser 和 ComposedGrounded 先用元素 ID 或元素描述做 grounding。只是到了最终执行层,仍然需要变成 x, y 或 path。
第二,tool_type 目前真正做了特殊处理的是 browser。例如 FARA、Yutori 这类需要 browser tool 的 loop 会要求 tool_type="browser",ComputerAgent._resolve_tools() 会把普通 Computer 包成 BrowserTool。源码里还留着 Future: elif required_type == "mobile",说明 mobile 专用包装还不是同级能力。
第三,自定义 computer handler 使用成本很低,但缺失动作会变成 no-op。CustomComputerHandler 只强制要求 screenshot;如果没有传入 click、type 等函数,对应动作就是空操作。这适合 mock 和测试,真实 GUIAgent 运行时需要显式提供完整动作能力。
第四,安全检查现在不是完整人审。_handle_item() 会读取 pending_safety_checks,但目前逻辑是直接放入 acknowledged 列表,旁边还有未来 callback 的 TODO:
pending_checks = item.get("pending_safety_checks", [])
acknowledged_checks = []
for check in pending_checks:
    acknowledged_checks.append(check)
来自 libs/python/agent/cua_agent/agent.py。
所以准确说,CUA 的动作协议里保留了 safety check 字段,但这个版本还没有实现“用户确认后再继续”的完整门禁。
第五,computer-server 的 /responses 注释说 “up to 2 turns”,但实际代码主要靠 pending_computer_call_ids 判断何时 break。这个差异写文档或二次封装时要注意,不要把注释当成严格行为。
第六,部分 loop 有额外依赖。Generic VLM 明确要求 qwen-agent、qwen-vl-utils;OmniParser loop 需要 cua-som。这些不是纯 Python 标准依赖,部署前要按模型路线装对应 extras。
源码索引
继续读源码可以按这条路径走:
| 主题 | 文件 |
|---|---|
| Agent 主循环 | libs/python/agent/cua_agent/agent.py |
| loop 注册和匹配 | libs/python/agent/cua_agent/decorators.py |
| 统一 Responses items | libs/python/agent/cua_agent/responses.py |
| OpenAI loop | libs/python/agent/cua_agent/loops/openai.py |
| Anthropic loop | libs/python/agent/cua_agent/loops/anthropic.py |
| UI-TARS loop | libs/python/agent/cua_agent/loops/uitars.py、uitars2.py |
| Generic VLM loop | libs/python/agent/cua_agent/loops/generic_vlm.py |
| OmniParser loop | libs/python/agent/cua_agent/loops/omniparser.py |
| 组合 grounding | libs/python/agent/cua_agent/loops/composed_grounded.py |
| Computer handler | libs/python/agent/cua_agent/computers/ |
| 轨迹和预算 | libs/python/agent/cua_agent/callbacks/ |
| VM / sandbox 启动 | libs/python/computer/computer/computer.py |
| sandbox 内执行器 | libs/python/computer-server/computer_server/main.py |
总结
CUA 的 GUIAgents 逻辑可以概括为:模型 loop 负责生成下一步动作,ComputerAgent 负责把动作转换为可执行调用,Computer / Sandbox 负责改变真实屏幕状态,截图结果再回到模型上下文。
这个拆法的价值在于可替换。开发者可以替换模型,从 OpenAI 换到 Claude、UI-TARS、Qwen、OmniParser;也可以替换执行环境,从云 Linux 容器换到本地 macOS、Windows、Android;还可以调整观测和生命周期策略,比如只保留最近 3 张图、保存完整轨迹、限制预算。外层循环不需要重写。
它的边界也同样清楚:安全确认还不完整,部分 loop 依赖额外包,mobile/browser 专用 tool 类型还没有完全对称,custom handler 的 no-op 需要显式处理。明确这些边界后,CUA 更接近一个电脑使用 agent 的实验与部署底座,而不是单点 GUI 模型封装。